Hirokos Blog
 Hiroko’s Kitchen made it onto CulinaryPrograms.net’s recently completed list of 100 Magnificent Sites for Chefs.
CulinaryPrograms.net says, “We built the list for the next generation of chefs who will soon be entering culinary programs and will need to stay up to date on the latest trends in cuisine, and know how to leverage the internet and other forms of media to get their work noticed. We think your site is a great example of how culinary professionals can use the web to their advantage.”
Posted
on 7:34 PM
in Hiroko's Blog
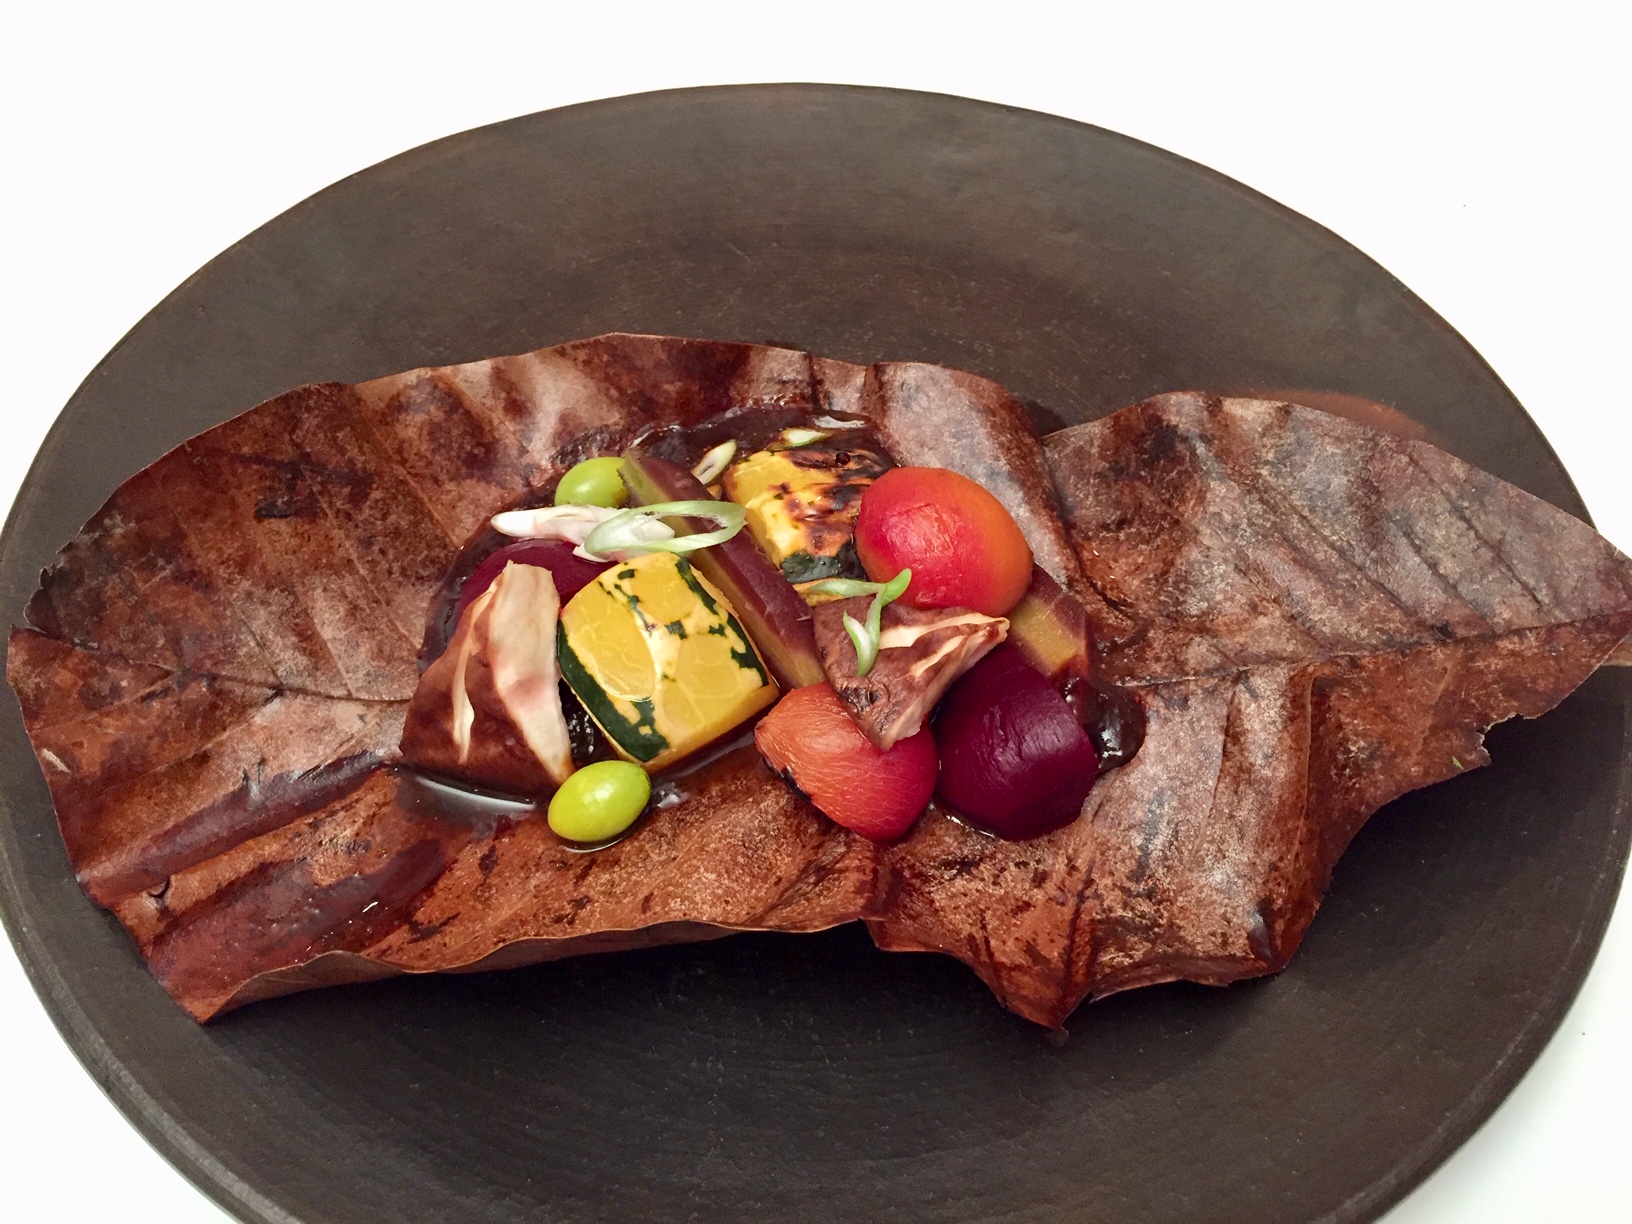
 Hoba-yaki is a dish, in which scallion slices and mushrooms are cooked together over a charcoal fire on the bed of flavored, simple miso sauce placed that are placed on a dried hoba (magnolia) leaf. In the past in the mountainous, rural areas where not many cooking tools were available, this preparation was born. The leaf was used as a cooking vessel. Since the leaf has antiseptic property, the use of leaf in the kitchen was win-win situation. Of course, the leaf must be far enough from the charcoal so that it does not burn or ignite. Anyway, dried hoba leaf is very arty.
Times have changed. Today artistic presentations using hoba leves can be very attractive for diners, so this once-humble dish has adopted by high-end restaurant kitchens. At these venues’ chefs devise more creative version of the sauces and use expensive and varied ingredients such as the combination of wagyu beef and mushrooms, seasonal seafood with vegetables and briefly seared chicken with scallions. The resulting dishes are sensational to see and are delicious.
If you are using the hoba leaves, please do not forget to soak them in water before using in order to prevent burning and ignition.
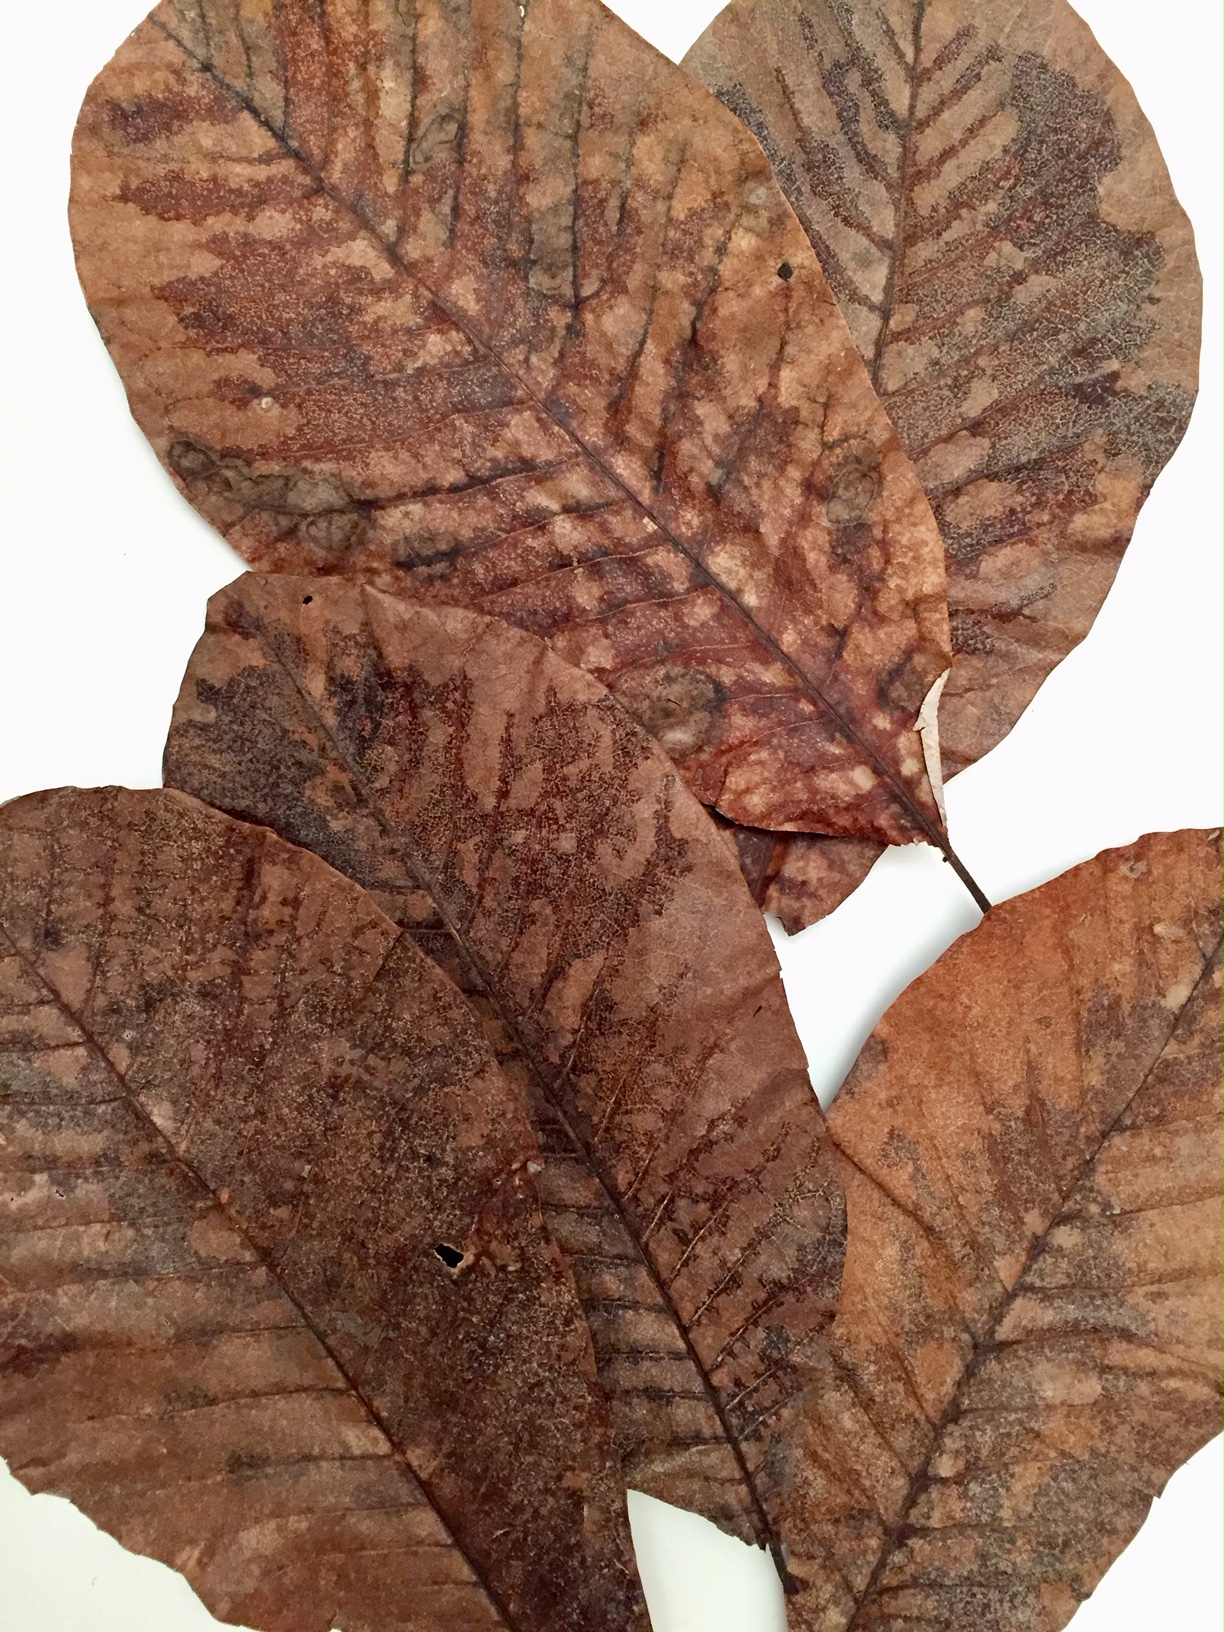
Recently I found a fresh, very attractive, deep-green fig leaf at Union Square Farmers’ Market in NYC. The leave has five large pointed lobes and resembles a giant maple leaf. The vendor’s sign says that the leaf has anti-diabetic property. After carrying them back to my kitchen, I washed them and divided them into two piles; one for fresh use and the other for drying.
I used the fresh leaf to present cooked food items on top of the leaves. Does this configuration contribute to our health, especially the problem of diabetes? I can’t say that I really have any further information about this.
One-week dried leaves are sitting on the kitchen counter. They will have to wait for my return from Japan at the end of this month. I am leaving for Japan tomorrow, July 7, to lead my tour, Kyushu with Hiroko 2018. So at that point they will be 5 weeks-dried leaves. Please follow the tour on Instagram; and you will enjoy what you see and you may want to join me with others for Kyushu with Hiroko 2019!
Posted
on 7:26 PM
in Hiroko's Blog, Recipes

 There is a Japanese technique which may be new to you in this recipe. Taking this special step is necessary in order to produce clean and delicious flavor in the prepared dish.
The technique is called Shimofuri, which literally means ‘frost-covering’. In this technique we first blanch scaled and cleaned fish in hot water in a pot until the surface turns white resembling frost. Then carefully cool and rinse the fish in a bowl of cold water with tap water running into it. By doing this fish sheds off-flavors and becomes clean allowing the simmering broth in the next process to remain clean, clear and delicious.
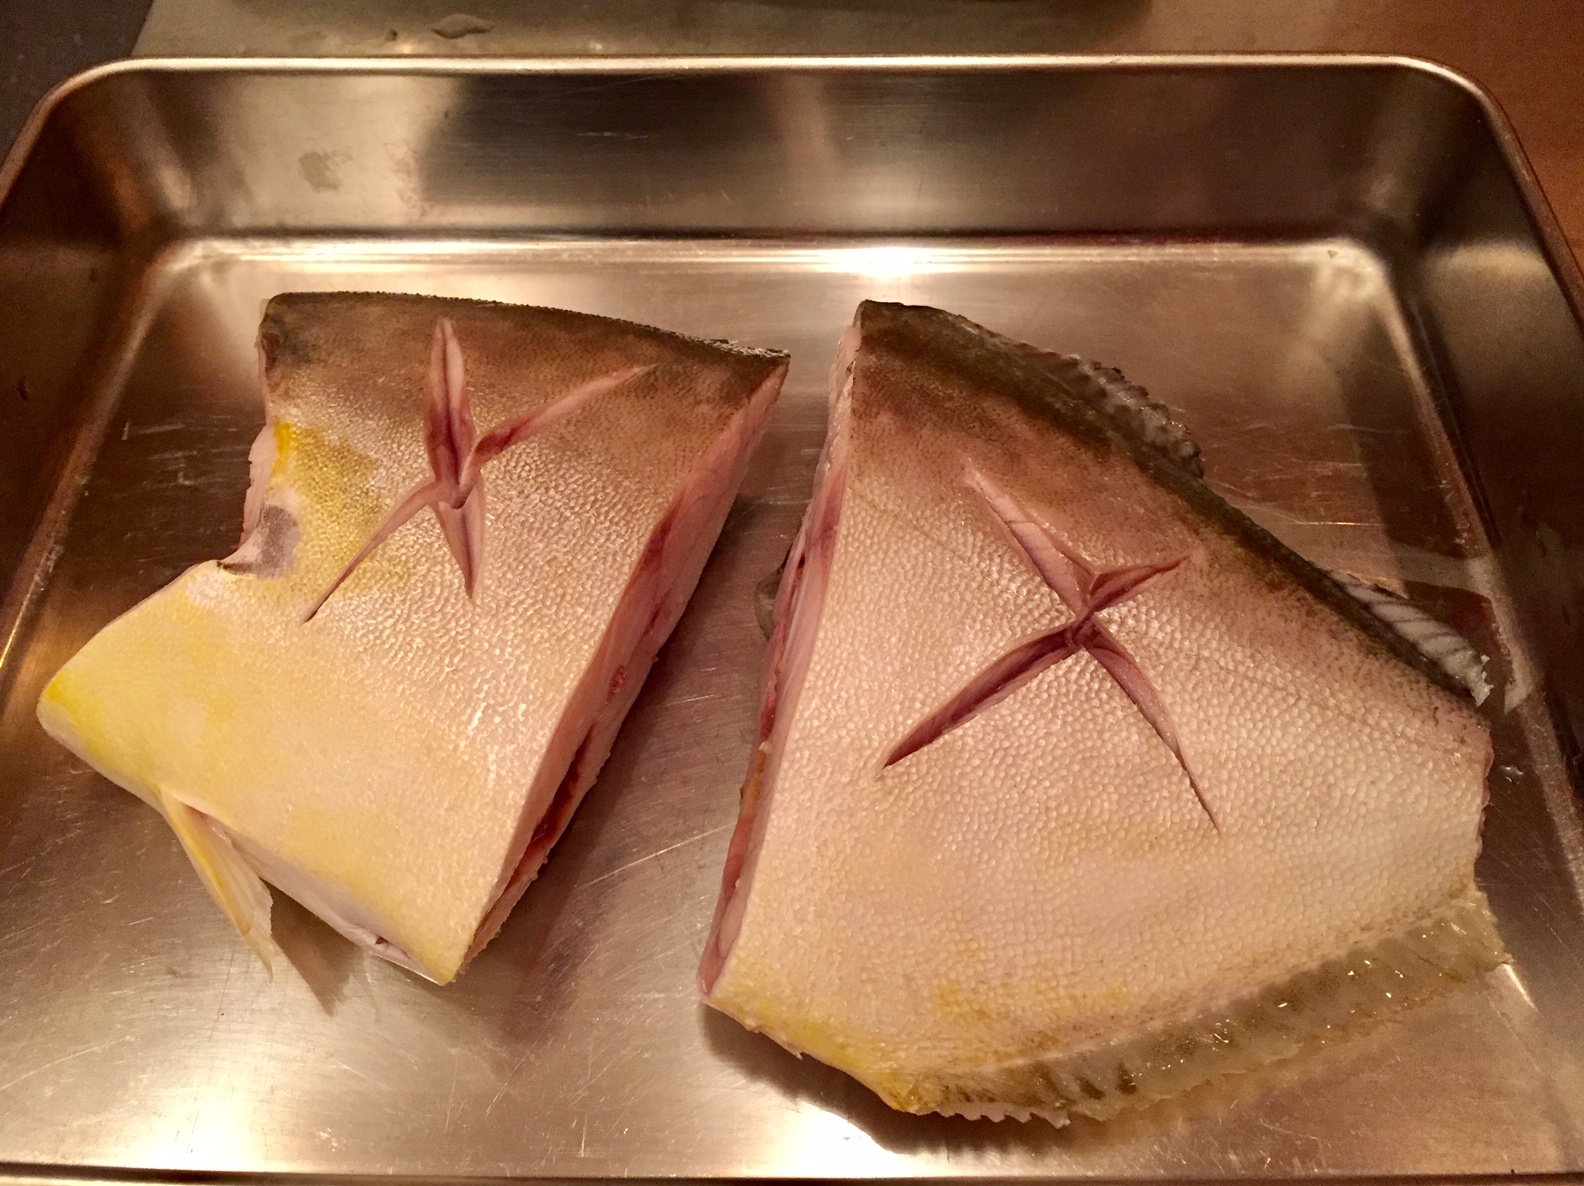 After Shimofuri we place the fish in a shallow and large pot in which fish fillets can be placed without overlapping. We simmer the fish in a mixture of dashi, kelp stock or water, sake and mirin. This mixture barely covers the fish. The proportion of dashi/kelp stock, sake and mirin is 3:1:1. Add few slices of peeled ginger to the pot to enhance the flavor of the fish.
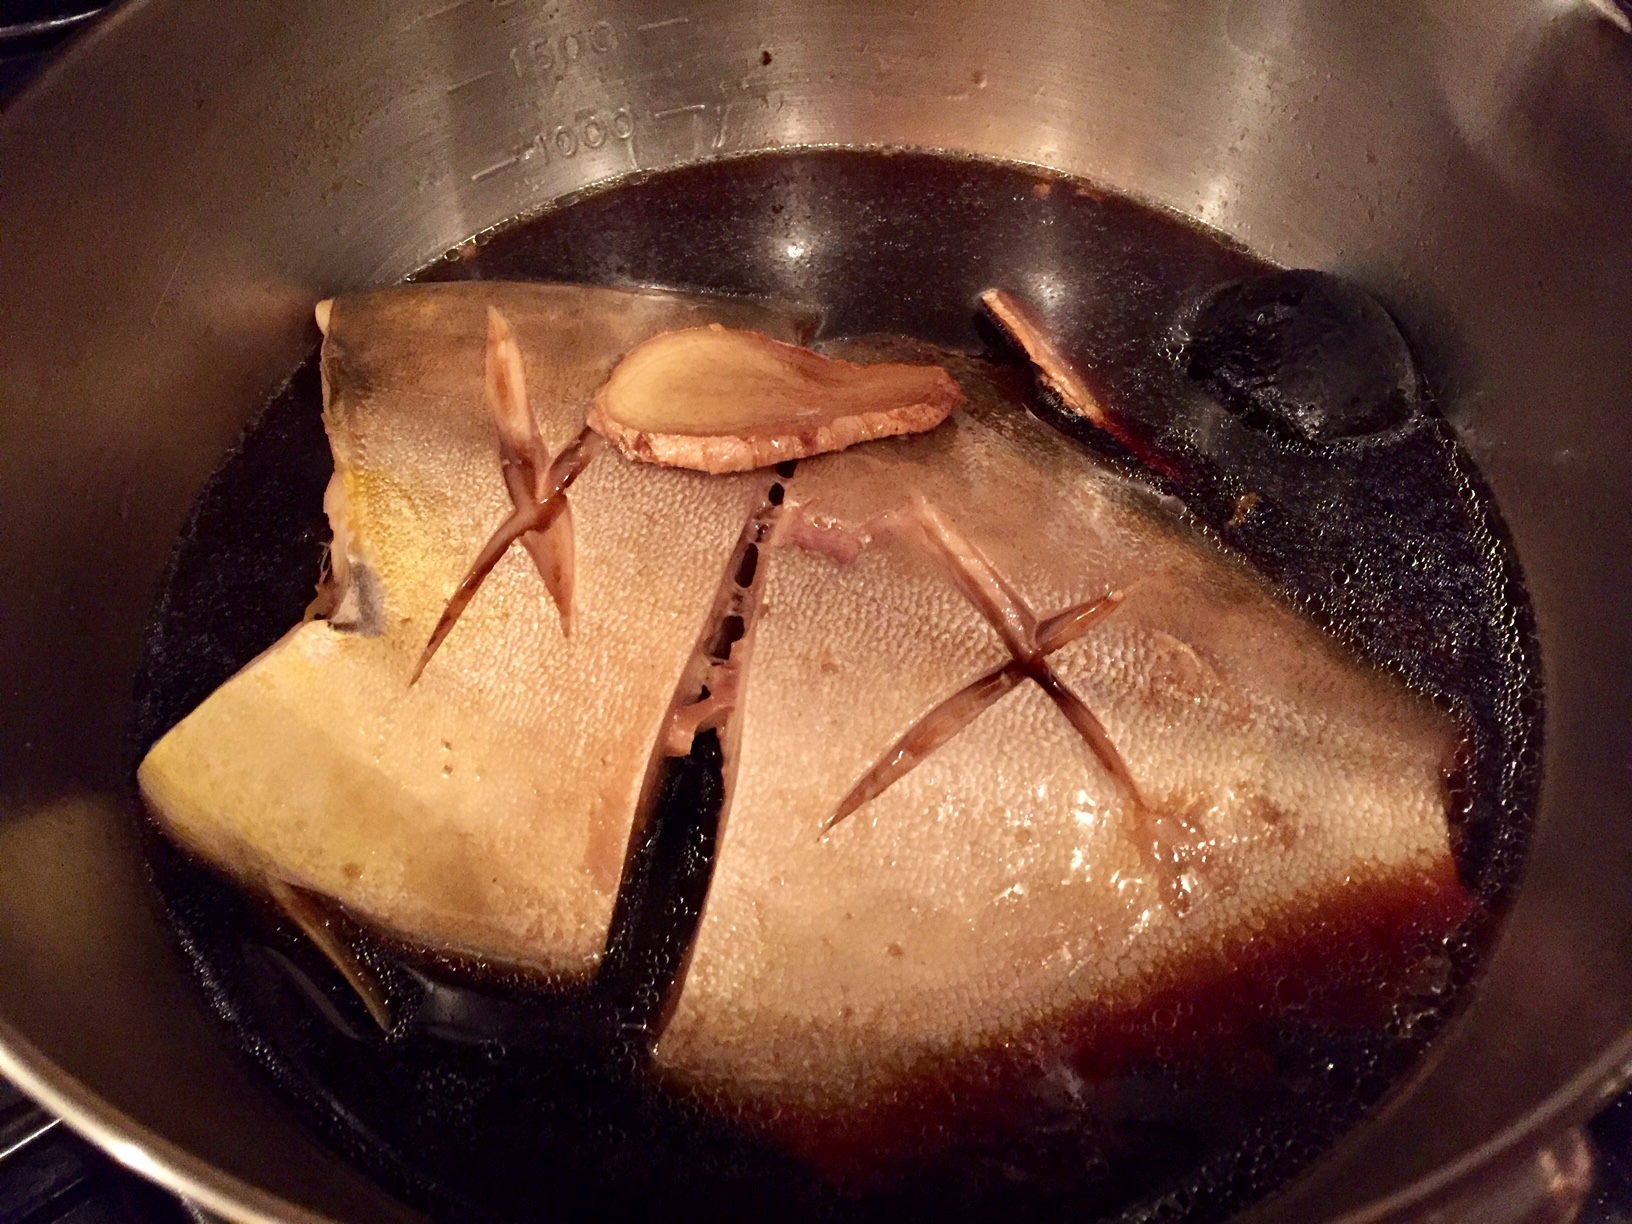 After cooking the fish about 10 minutes, covered with a drop lid (if you do not own a Japanese wooden drop lid, use a disc of parchment paper cut to just fit into the pot on top of the simmering ingredients), about 10 minutes, add the shoyu in the same quantity as the mirin. Cook until the cooking liquid is reduced by half. The cooking time varies depending on the size of the fish in the pot usually about 10 minutes. Serve the fish with a portion of the cooking liquid.
If karei (flounder) is not available, use salmon steak (with bones). If you can get wild-caught pompano, try it with this meaty, delicious fish. Nizakana is a wonderful fish dish enjoyed by everyone during the colder seasons.
Posted
on 7:20 PM
in Hiroko's Blog
 How to distinguish a flounder from a fluke? Both are bottom-feeding flat fish. Both have two eyes on the upper side of their flat and thin body. But their flavor and texture are different.
On one recent early morning at the Blue Moon fish monger at the Tribeca Framers’ Market in NYC a lady customer and a young sales person were in conversation about the difference of these two bottom-feeding fish. The lady insisted that they are the same fish; the sales person repeated that they are different fish. Because of their intense and heated chat, I did not join the conversation. But after she left, I snatched the topic of the morning’s heated conversation – a beautiful 5-pound fluke and a small flounder – and brought them back to my kitchen.
“Hidari hirame; migi karei”; this is what my mother taught me about how to distinguish between these flat fish based on their appearance. It literally means that when you place these two fish with their eyes looking up and with their belly side facing you, the head of the fluke, hirame (also called “summer flounder” in America) is on the left side, and the head of the flounder, karei (also called a “winter flounder” in America) is on the right side. Summer and winter name added to the flounder is confusing. July through February is the season of enjoying fluke. When it comes to karei, the best tasty season is February and March. There is another way to tell the difference. Karei (flounder) has brown skin color and has very small head and mouth. Hirame (fluke) has a large toothy mouth.
Karei is a watery fish, so is suited for salt-drying and grilling, or it may be immersed in flavored broth. Karei is the basis one of the most favorite nizakana (simmered fish dish) in Japan.
Hirame’s (fluke) season comes in autumn through winter. Cold water firms up the muscle meat of the fish and fish develops slight but pleasant oiliness. The most popular hirame dish is usuzukuri. In this dish sashimi quality fish is sliced paper thin and is served with ponzu sauce along with condiments. Condiments may be thinly sliced asatsuki green onion (chive-like green onion) and grated daikon radish mixed with red chile pepper powder. Because of the addition of the red chile pepper powder, the grated daikon acquires a pretty red color. This reminds us of momiji (the colorful red maple leaves of late autumn) and is given the name momiji-oroshi (grated daikon in red maple color). Seasonal inspiration is always present in the Japanese kitchen.
The next post is a recipe for simmered Karei (flounder). I hope you will enjoy this new way of preparing fish.
Posted
on 7:17 PM
in Hiroko's Blog
 The color of this azuki gohan displays a mellow but very elegant red hue. It consists of rice cooked with azuki (sometimes spelled “adzuki”) beans. Because of its attractive color azuki gohan is considered a good luck meal item and is served at auspicious occasions in Japan.
Azuki beans are rich in minerals including magnesium, potassium, zinc and iron. They are also rich in protein, B vitamins and soluble dietary fibers. It is clinically proven that azuki has antioxidant, anti-inflammatory and anti-cancer property. With this information I am sure that you will want to make this simple, elegant, healthy and delicious rice dish in your kitchen.
Here is the recipe. I always use dry azuki beans for this dish, because already cooked canned azuki beans that I find at supermarkets are cooked a bit too tender. If cooking the dry beans is too much labor for you, then find and use the already cooked canned and unflavored azuki beans. If you are doing from scratch with dried beans, rinse the beans in plenty of water in a large bowl. Change the water several times. Drain the beans and place them in a large pot along with water which is 5 times more volume than that of the beans. Soak the beans overnight. Remove the beans and soaking water from the refrigerator and transfer them to the pot. Place the pot over medium heat and bring to a boil. Then, cook about 5 minutes. Drain the beans and rinse them under tap water. Return the beans to the pot and add new water. Bring it to a simmer over medium heat and then turn to low heat, cook the beans until they are tender, but are on the firmer side. Cooking time varies depending on the dry beans you have selected, but cooking time is in the range of 1 to 2 hours. During cooking check the water level several times and add additional water to the pot so that the beans are always well submerged under the cooking liquid. Turn off the heat and drain the beans, reserving the bean-cooking liquid.
When I prepare this type of mixed rice, takikomi-gohan, I always use a donabe (earthenware) pot. If you do not own a donabe pot, you can prepare the dish in a rice cooker. And if you do not have a rice cooker, use a deep pot, rather than a shallow and large one. The pot must have a tight-fitting lid.
Ingredients
2/3 cup dried azuki beans or 1 ½ cups cooked azuki beans
4 cups polished rice, rinsed 3 to 4 times changing water; soak the rice in the in bean-cooking water for half an hour or more to color the rice. Drain the rice and dry for 20 minutes, reserving the bean-cooking water.
4 cups azuki beans-cooking liquid
1 teaspoon sea salt
Toasted mixture of black sesame seeds and sea salt
Add the rinsed and drained rice to the donabe pot, rice cooker pot or regular pot. With your hand, level the top of the rice. Add the cooked beans to the pot and cover the rice evenly with the beans. Add the azuki bean-cooking liquid and salt. Cover the pot with the fitting lid and cook as follows for a donabe cooking pot. Put the pot over very high heat and immediately set your timer for 15 minutes; after 3 to 4 minutes of cooking you will begin to see steam coming out from the little hole on the earthenware lid. Turn the heat to very low and cook until the timer beeps. Then, turn the heat to very high again and count to 60. Turn off the heat completely. You will see a strong flow of steam escaping from the little hole in the lid. After 2 minutes or so, the steam will subside. After further 5 minutes of resting, remove the lid from the pot and with a spatula stir the rice gently and thoroughly so that the beans are evenly distributed through the rice. Divide the rice into 5 rice bowls. Sprinkle the black sesame seeds and salt mixture over the rice.
I am leaving for Japan tomorrow, July 7, to lead my tour, Kyushu with Hiroko 2018. So at that point they will be 5 weeks-dried leaves. Please follow the tour on Instagram; and you will enjoy what you see and you may want to join me with others for Kyushu with Hiroko 2019!
Posted
on 7:08 PM
in Hiroko's Blog, Recipes
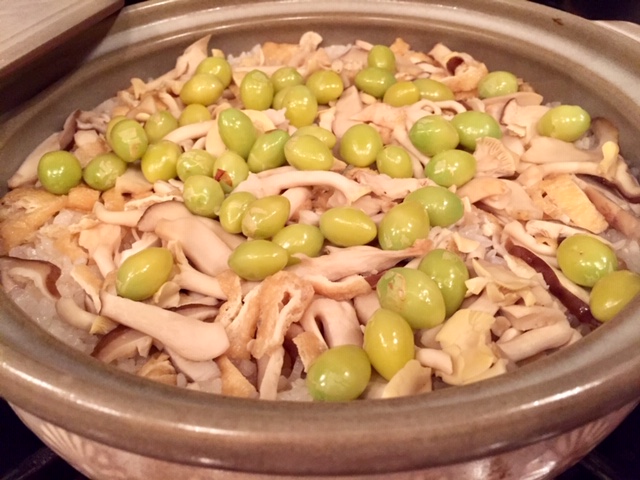
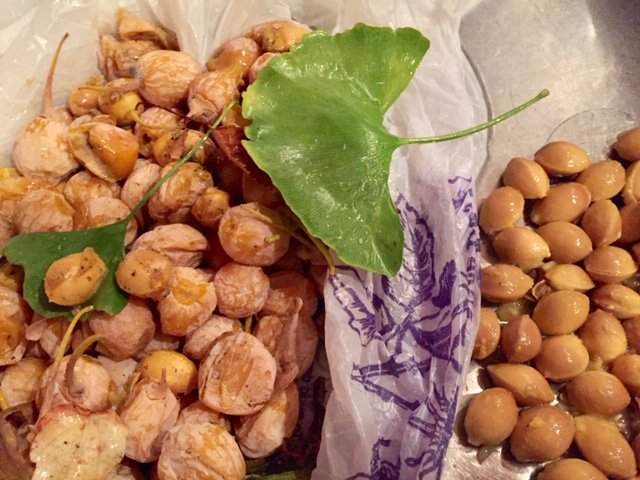

FORAGING IN NEW YORK CITY: Gingko nuts are DELICIOUS! Here female gingko trees (there are male and female gingko trees) drop their mature fruit onto the sidewalks, streets and parks from the beginning of November through the end of the month. Every year the timing is a bit different, though. Most of the fruits which hit the ground break and expose its flesh inside. The flesh releases a very strong disagreeable smell. But this hideous smell is not the issue here. The remarkable thing about this plant is that gingko trees have been on earth since the dinosaurs age. They have high tolerance for drought, physical abuse and air pollution and thus have been planted as decorative trees along streets in many cities. Maybe, that strong smell repels Devil, bad fortune and predators and is responsible for the survival of this ancient plant.
To foraging for gingko nuts you need one or two disposable plastic bags. If you are conscious about environment, bring a plastic or steel kitchen bowl with you. You may need a pair of thin kitchen plastic gloves (Buzz, my husband, picks them with his bare hands and he is totally OK. He washes off the stink after we return home). Now go out into your neighborhood and first look up to see if there are gingko trees. And then find the fruit-bearing female trees. They are far fewer than the male. This is because no one want to plant a female tree that produces such stinky fruit. Indeed, I have been told that the female trees we find in the city are the result of mistaken sexual identity by those who planted the trees many years ago. At the same time use your nose to detect the unusual pungent smell. Once you find the ground concentrate on picking the stinky, smelly nuts. Some passersby hurrying past the stink look down at us and have confused, bewildered expression. Others totally ignore us. Be prepared for these two reactions.
After confirming that you have filled the bag or bowl, head back to your kitchen without stopping at your favorite coffee shop to get a cup of coffee. Remember that you are carrying a good number of smelly nuts and you are surround by the smell.
REMOVING THE SMELLY FLESH: At the sink in your home with a cold tap water running, remove smelly flesh with your glove-worn hands. Buzz does this with his bare hands. Make sure that all flesh is removed from the nuts. Now you have gingko nuts which are covered with hard shells. You may wash the nuts in a lukewarm water with a little detergent. This removes complete off-flavor and any remaining smell.
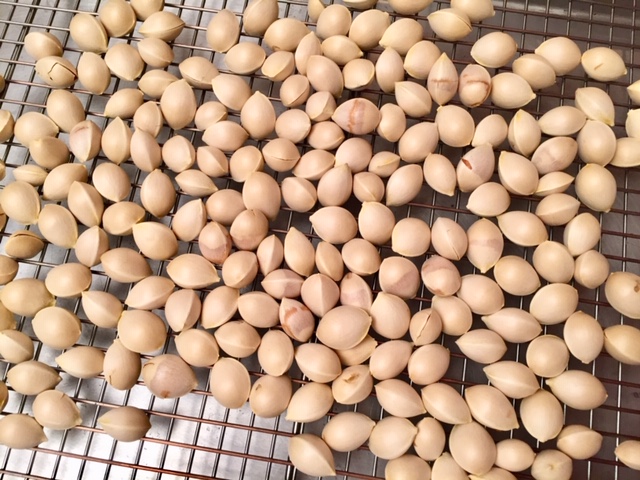
DRYING: After rinsing the nuts drain them well. Spread them over a fish grill, which is placed on the sheet pan. The hard shell will completely dry in 5-7 hours, and the nuts are completely odorless after all your hard but fun work. Remember that you are going to taste super healthy and delicious nuts.
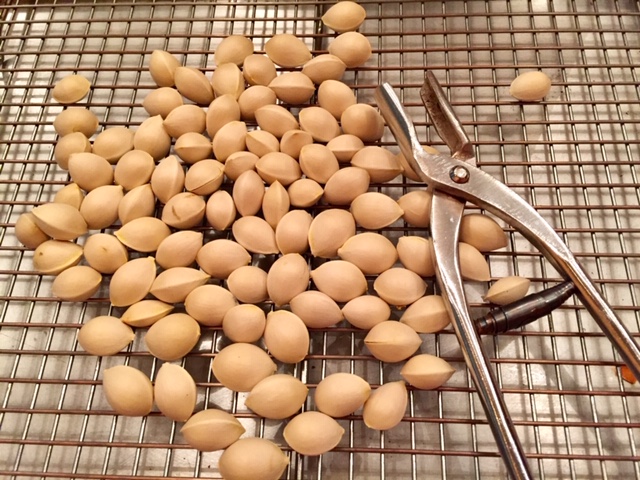
REMOVING HARD SHELL: For removing the hard shell, there is a special tool to make this process easy and effort free. You can also use a nutcracker or part of a scissors. I have posted two ways to do this on Instagram. The important tip is that you apply gentle pressure on the device, or nuts are squashed and cut in half.
ENJOY SHELLED GINGKO NUTS IN MANY WAYS:
- Deep-fry at 350-degrees F for 2 minutes; the thin brown skin will start to be peeled off during cooking; remove the nuts from the oil and sprinkle with sea salt. They are ready to consume; slightly bitter and delicious.
- Cook with sea salt: add the sea salt and the nuts in a skillet and heat until the salt and nuts are heated up. Turn the heat to low and continue cooking for about 5 minutes. They are ready to consume.
- Cook in water barely covering the nuts in the skillet. Bring the liquid into a simmer and cook the nuts about 4 minutes; towards the end of cooking gently roll the beans with a skimmer-like tool. This helps to remove the thin brown skin of the nuts. Partially cooked gingko nuts can be frozen at this stage for later use. Or, these nuts can be used in chawanmushi (savory egg custard), gingko nut takikomi gohan (rice cooked with gingko nuts), and in stir-fried and soup dishes.
No matter in which way you are going to enjoy the gingko nuts, bear in mind the advice on the number of nuts to be consumed at one sitting. Go back to my archive articles for the details!
Love autumn; love nature; love gingko nuts. Thank you, autumn; thank you, nature; and thank you, gingko trees.
I am leaving for Japan tomorrow, November 7 to lead my tour, Kyushu with Hiroko 2018. Please follow me on Instagram. I will be posting photos and videos. You may want to join me with others for Kyushu with Hiroko 2019!
Posted
on 2:18 PM
in Hiroko's Blog

Announcement of Kyushu with Hiroko 2019:
Now it is the time to announce the Kyushu with Hiroko November 3-14, 2019. This is the second Kyushu tour to be offered and conducted by Hiroko; It is designed expressly to accommodate those who expressed interest in the 2018 tour, but because of scheduling issues could not join, and for those who have not previously been acquainted with this unique travel, educational and thoroughly enjoyable experience. The 2018 tour is fully booked with excited travelers and ready to depart this November.
Please enjoy reading the itinerary and checking out the photos of the Tour: https://hirokoskitchen.com/kyushu-with-hiroko/ The content of itinerary of 2019 tour is as the same as the one of 2018. If you want to join the tour, contact Hiroko promptly to reserve your space. Hiroko takes 9 attendees: Double occupancy and single occupancy mixed. At this early stage, there is no deposit requirement. Hotels, transportation and other venders have not set up their prices for 2019 at this time. I will offer you the price of the Kyushu with Hiroko 2019 after the New Year. For your reference I can offer you the price of this year’s Kyushu with Hiroko 2018 tour. Please write me.
Posted
on 1:31 PM
in Hiroko's Blog

Onigiri O-chazuke
‘Cha-zuke’ (the ‘O’ is an honorific) literally means cooked rice served in brewed liquid tea. It is a rice dish in which hot water, hot brewed tea or hot flavored dashi stock (Japanese stock) is poured over cooked rice in a rice bowl. Cha-zuke was born out of necessity because in the past during hard times we did not to waste cooked rice. Also, the hot liquid helped to revive old and tired long-stored cooked rice.
You may have enjoyed a variant of this dish, onigiri Cha-zuke at a Japanese restaurant. This is a popular dish at an izakaya, the informal restaurants serving snacks, small dishes and accompanying drinks. In this dish a grilled, brown-hued onigiri rice ball is placed in a bowl and hot liquid – could be tea, could be flavored dashi stock – is poured over it. After a short while the onigiri rice ball slowly disintegrate in the hot liquid. You enjoy it as its texture changes.
In the past without rice cooker with its “keep warm” function or a refrigerator, leftover cooked rice was stored at room temperature and kept until it spoiled. Cooled, dry rice was no longer very tasty because the nature of the starch chemically changes from alpha types to beta during such storage and this results in a firm, closed mass of rice with no fragrance.
The quickest way to revitalize this cold, stored rice was to shower it with hot liquid. Hence, the birth of Cha-zuke. Cha-zuke has this very humble origin and remains this way today. The dish is usually eaten after a rich meal to refresh our mouth and to fill the last space in our stomach. To cheer it up a bit we sometime add toppings such as umeboshi (salty plums), tsukemono (pickles), salt grilled and flaked salmon, nori sea vegetable, or other taste enhancers.
Today is a snacking age and Cha-zuke might fit to this trend. If you cook rice at home regularly making Cha-zuke is a piece of cake. Put the rice (microwave it if it has been stored in the refrigerator) in a cereal bowl and add hot Japanese tea that becomes your “consume” – try matcha, hojicha roasted tea, genmaicha brown rice tea or sencha fine green tea. I never have tried it with Chinese or Indian black teas or with coffee, but you can experiment with these or other hot liquids if you wish.
Cha-zuke is a unique, delicious and innovative way to enjoy rice, especially older left-over rice that you might think cannot be revived to produce a delicious dish. It is healthy. No oil is involved. You are consuming rice together with liquid, so you are consuming fewer total calories, but making your stomach satisfyingly full. If you ever tasted cha-zuke at Japanese restaurant, let me know of your reaction!
Posted
on 11:28 AM
in Hiroko's Blog
 Snacks and snacks packed in fun and colorful packages, snacks on-the-go, candies, sauces for snacks….. Are we heading to a completely no-cooking wonderland?
At the 2018 Summer Fancy Show I was amazed at how much the products scene has changed. Cooking sauces or basic cooking ingredients have shrunk to 10% of total products introduced at the Show.
I enjoy cooking to nurture my body, health and soul as my 91 years old mother still does in Tokyo (well she cooks 3-4 days a week and my sister covers the rest of the week). I don’t often buy packaged goods, so this show was an eye-opening experience, even though I know full well that this has been the trend in the past years. I read about the trend in Specialty Food News.
 Among few cooking ingredients that remained at the Show and stood out this year was one of my favorites. It is Miso Master Miso products, including chick pea miso, from Great Eastern Sun Company. The company has been producing the quality miso every day for more than 30 years. Their delicious miso is the base for my creation of so many delicious sauces for savory and dessert dishes.
 I found another favorite product this year. It is maple syrup from Rocky Ridge Maple Farm. You already know that I use maple syrup from time to time to replace fake mirin. This delicious, quality, artisan maple syrup comes from Canandaigua, New York. The owner, Joshua, was born and raised as a dairy farm boy. He became a pharmacist but his passion for nature and quality food products pushed him to become a maple syrup producer.
Rocky Ridge Maple Farm produces three products – lighter colored, dark colored and barrel aged maple syrups. The sap that is collected in the early spring consists mainly of fructose (sucrose is converted by microbes and enzymes to fructose and glucose) that has more sweetness. So, the lighter golden color early spring maple syrup tastes very sweet. In general, Joshua’s maple syrup has sweetness of around of 67 to 68 on the Brix scale. For contrast raisins are at around 70. I tasted each of his syrups and loved them all. The darker colored one was robust both in maple flavor and character; the bourbon barrel aged maple syrup had the most rounded flavor with elegant fragrance. Their products are sold at Whole Food, I was told. So, I went to Whole Food at Union Square, NYC, but couldn’t find it. Please let me know if anyone is buying this maple syrup in the City…where?.
With these two wonderful products – miso and maple syrup – here is what I am going to make: Miso-Maple Syrup Sauce for my rice-cream made that is from koji rice. I make the rice-cream to enjoy during this hot summer time. For this sauce we need Sweet Miso and light color maple syrup. That’s it. This sauce also goes well with sandwich with hams and prosciutto. In America I think we often add too many flavors to many products. This kills the true nuances of flavor and disguises the character of ingredients. If we begin with very high-quality materials we should limit the number of flavors added to say, the sauce, in a single preparation so that these wonderful ingredients can each speak with its own voice.
Quality and simplicity go hand-in-hand. At Rocky Ridge Maple Farm 40 gallons of maple sap is processed to make 1 gallon of maple syrup. And I will lick the last drop of maple syrup in the bottle.
Posted
on 7:53 PM
in Hiroko's Blog
Eating along with the season is my motto.
I purchased the first-of-the-year wild dandelion at the Union Square Market here in NYC! It is one the first local greens to show up at the farmers’market in spring. Wild dandelion has noticeable bitterness and astringency that is ubiquitous in many early spring wild, mountain and field plants and vegetables. Dandelion is rich in Vitamin A, iron, calcium, Vitamin K and potassium. My winterized body that had been fueled by many root vegetables for more than months than I expected, is finally treated to fresh dandelion greens .
I prepared dandelion in traditional Japanese goma-yogoshi preparation. Goma-yogoshi literally means ‘vegetables, smudged with ground sesame seeds’. Well, this may not sound appealing to our ears, but believe me, it is a tasty and delicious preparation that works very well with many early spring greens.
Here is how to prepare and enjoy goma-yogoshi. Toast whole black sesame seeds in a little skillet until the seeds are all warmed up and puffed up; transfer the sesame seeds to the suribachi mortar or food processor and process until the seeds began to produce a bit of oil; by this time the toasty and fragrant aroma will permeate your kitchen especially if you are doing the grinding manually in a suribachi mortar; add small amount of good quality shoyu and some maple syrup to the ground sesame seeds to taste, and the dressing is ready. The dressing has a rather dry appearance, but this is how it should look. Blanch the dandelion or other greens in boiling salt water for 1 to 2 minutes. Drain them; cool them in ice cold water; squeeze out the excess water and cut the vegetable into 2-inch lengths crosswise. Toss the greens with the sesame dressing.
Posted
on 4:49 PM
in Hiroko's Blog, Recipes
Coconut Water, Kombucha, Aloe Drink, Ann Migo, Kovita in bottles…. the new super drink list goes on and on. I have something new for you. It is amazake. And it is home-made amazake that you can easily prepare. Amazake literally means ‘sweet sake’, but it has nothing to do with sake (rice wine). Amazake does not contain alcohol. Amazake is a naturally sweet rice drink. Amazake is a power house packed with nutrients.
Have you ever had in your life experienced an intravenous liquid drip that is administered to hospital patients? This so called IV drip can keep a patient’s life going for several days without any additional nutrition. Amazake has nutritional value similar to an IV drip. Therefore, when energy and stamina were necessary during the excruciating hot and humid summer amazake became a popular beverage enjoyed by commoners in the crowded city of Edo (present-day Tokyo) in the 18th and 19th century.
Amazake is made from koji rice; rice malted with koji spores. In my previous blog – ‘Koji is Aspergillus oryzae’ – you can learn about koji. Just as are shoyu, miso and sake, the sweet-tasting rice drink, amazake, is made from koji rice.
Factory-made and bottled amazake products are available at Japanese food stores, but I urge you to make it yourself. If you make it yourself, it is the real amazake with no added chemicals. Preparation of amazake is very easy and simple, and here is the recipe for you. All you need koji rice (rice with koji spores attached) and a rice cooker or yogurt maker.
Koji rice: I use Cold Mountain Dry Koji Rice. You can purchase this product on line or use other similar dry koji rice available at Japanese and Asian food stores or on line.
Rice cooker: I use Zojirushi IH that I have owned for more than over 10 years. This is a “Tesla” of rice cookers. It cooks rice properly and deliciously every time. Making amazake in this quality rice cooker is also super easy job. But you may instead use any rice cooker or your yogurt maker. For extra nutrition, I use brown rice in my amazake preparation.
Brown Rice Amazake
1 cup (Japanese rice cooker cup) medium- or short-grain brown rice
5 cups (Japanese rice cooker cup) water
7 ounces Dry Koji Rice, rubbed between your hands for a minute or so
Cook the brown rice in the rice cooker using the “porridge” function or setting. After cooking the rice reset the rice cooker to the start position. Cool the cooked rice porridge in the rice cooker bowl to 140F. Transfer the cooked rice porridge to a juicer of food processor; add the Dry Koji Rice and quickly process until pureed. If you are using polished white rice, omit this process. Transfer the rice and koji mixture quickly back to the cleaned rice cooker bowl. Set the rice cooker to KEEP WARM function. Cover the rice cooker bowl with a clean kitchen towel and lower the rice cooker lid until it is 80 percent shut. This will keep the temperature of the inside rice mixture at around 130F. Leave it as is for 10 hours. Adjust the rice cooker lid inclination to control the inside temperature
Choose a day when you will be at home during the 10 hours that the mold spores do their magic work. This does not mean that you must be at the rice cooker continuously. After mixing the koji rice and warm water together, and transferring it to the rice cooker, the rice cooker and koji do almost the entire job, including keeping the temperature of the koji rice and water mixture at proper temperature. You, however, need to babysit it. Every hour or so please check the temperature of the rice koji and water mixture in the rice cooker bowl and make sure that the temperature is always at around 130F. If the temperature goes too high it could kill the mold. As time goes by you will notice more of the carbohydrate in the rice turning into sugar than at the beginning, making the mixture sweeter and more fragrant. Please also stir the rice koji and water mixture. And do not forget to taste it at each stirring time. This is the most fun part of amazake making!
After you have made amazake store it in a clean glass jar or freezable container with a tight-fitting lid. I store one quarter of each batch amazake for immediate consumption – that one is kept in the refrigerator and is good for a week. When you consume amazake you may dilute it with cold water or sparkling water in 1:2 to 1:3 ratio. Squeeze some lemon juice or ginger juice before enjoying it as a cold drink.
I freeze the rest of the just-made amazake for later consumption. Frozen amazake does not get icy hard. It stays in an easy-to-scoop texture that can be removed with a large spoon. I call the frozen amazake ‘Rice Cream’. I often puree the amazake with banana, mango or other seasonal fruit before freezing, making it ‘Fruit Rice Cream’. Enjoy. I know you will.